Import or Export Existing Customers
Table of Contents
A Customer is the top-level entity representing the name of your client and/or their business.
You can import a list of existing customers, or manually create new customers.
You can import your customers into Syncro from a CSV file, or from an accounting software such as QuickBooks or Xero. We strongly recommend importing your customers this way if they already exist. This import automatically links your customers with their QuickBooks/Xero counterparts, ensuring they sync without additional steps.
Tip: For best results when running a customer import from QuickBooks or Xero, ensure customers in the accounting platform have unique business names, emails and phone numbers. Attempting a customer import when multiple customers in your accounting platform have the same email and/or phone number can and will result in incorrect mapping.
You can also export customers from Syncro into a CSV file for other purposes, including a mass update of customer data.
Import Customers from QuickBooks or Xero
Both QuickBooks and Xero integrations setup wizards will prompt you to import your customers during the setup process.
Import Customers from a CSV File
Prerequisites
Check these prerequisites to ensure a smooth import experience.
Disable Required Fields for Customers
A new Syncro account begins with none of the Customer fields required.
To verify this or change the settings back for ease of importing, follow these steps:
- Navigate to the Admin tab.
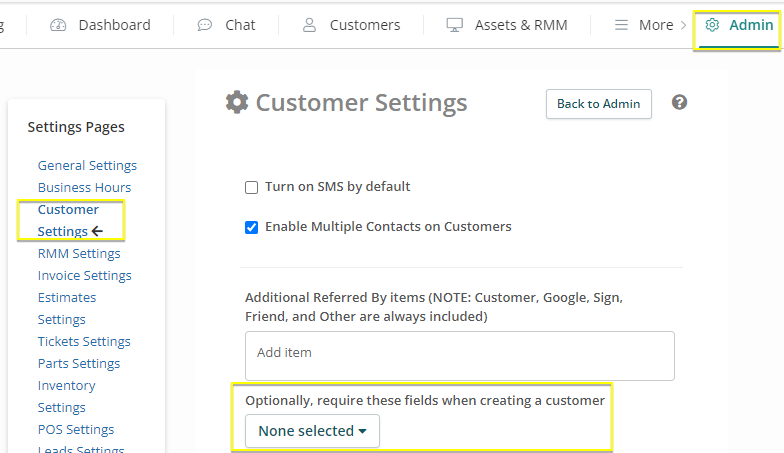
- In the Customers section on the left-hand side, click “Customer Settings." The Customer Settings page displays:

- Make sure the dropdown menu under the “Optionally…” text says “None selected.” If it does not, click the arrow and uncheck any checked boxes.
- Click Save.
Prepare Custom Customer Fields
If you use any customer-related fields that aren’t in Syncro by default, it can be helpful to prepare your CSV file with these custom fields prior to importing all your customers.
You’ll see the Syncro default Customer fields when you Download the Syncro CSV Template. The last column in the spreadsheet is custom_fields.
To prepare a thorough and accurate import when using custom fields:
- Manually create a single Customer with all your organization’s custom fields so it is exactly what you want for all customers. See Create a New Customer and Create Custom Fields for instructions.
- Export the customer list (containing the sample customer you created) from Syncro. See Exporting Customers from Syncro for instructions.
- From the exported spreadsheet, copy the contents of the custom_fields column into the spreadsheet you use to Populate the CSV Template with Customer Data.
The custom_fields column contains a semicolon-separated list of field:value pairs, e.g. CustomFieldName1:Value1;CustomFieldName2:Value2
Download the Syncro CSV Template
IMPORTANT: Syncro will never put formulas in spreadsheets. If you get a warning about a formula or running code in a CSV/Spreadsheet always click NO, Do Not Run.
To import your existing customers from a CSV file, follow these steps:
- Navigate to the Admin tab.
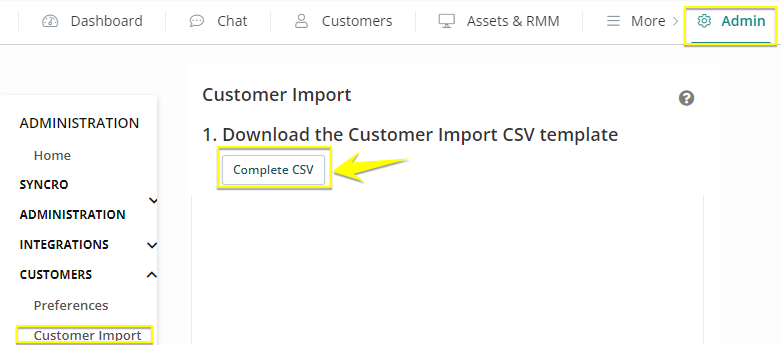
- In the Customers section on the left-hand side, select Customer Import.
- Click Complete CSV to download the official Syncro CSV template:

Populate the CSV Template with Customer Data
- Locate and open the example-complete-customer-import.csv file in Excel or other spreadsheet program.
- Fill in the spreadsheet with your customer information and save it. Be sure you have values populated in at least 2 out of the 5 following columns for all rows in the CSV for a successful import:
- firstname
- lastname
- business_name
- phone
Note: If you haven’t already, you may want to review the Prerequisites.
Import the CSV File into Syncro
Return to the page described in Download the Syncro CSV Template and click Choose File. Select your completed CSV file, then click Import:

Viewing the Import Results
After clicking Import, the Import Results page displays (/reports/import_results). You can safely refresh this page to view the import results without causing duplicate customers in your Syncro account.
Example of a successful import:

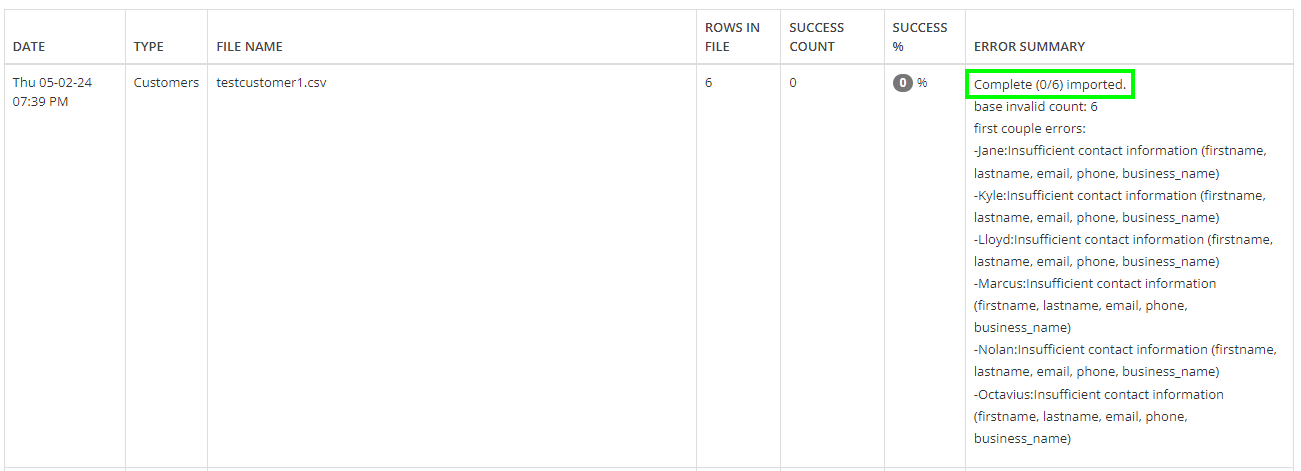
Example of an import with errors:

Set Required Customer Fields
After a successful import, return to the page described in Disable Required Fields for Customers and select the fields you’d like to make required.
These will appear as required fields for new Customers going forward.
Troubleshooting Import Issues
The table below describes common import issues and errors, and how to correct them.
Issue/Error |
Description |
Possible Solutions |
The import fails with error summary: “Complete (0/0) imported.” |
You can remove the second row populated with example data, and leave any columns that are not applicable blank.
A few specific columns are required for a successful import. |
Ensure the column headers in the CSV file have not been modified from the original template.
Verify that the CSV file you’re importing contains at least 2 of the following 5 columns:
|
The import fails with error summary: "Import failed to complete: (0/XXX) imported. base invalid count: XXX" |
Your formatting of your columns in the CSV is incorrect. |
Double check that your column headers are accurate, with no errors in capitalization or hidden extra spaces. |
You get an error about UTF-8 during testing. |
The CSV format must be in UTF-8 to import correctly. |
Upload the CSV to a Google Drive, and then re-download. This should automatically convert it to UTF-8. |
You experience a low percentage of failures (i.e. < 20%). |
There’s likely some bad data in the import file. |
Double check for errors in your data. Some examples of errors may include:
|
You experience a high percentage of failures (i.e. > 20%). |
Most/all of your data is formatted incorrectly, or some of your columns are mislabeled/swapped around.
|
Ensure the CSV file has been adjusted to fit our format. |
The error summary says “email,phone,mobile invalid:”. |
The error summary is grouped by the fields that failed validation, so this means those records failed all of these fields at the same time. |
Review the settings and remove any requirements on these fields. |
Exporting Customers from Syncro
Note: This process will automatically download a CSV of all your customer data to your machine’s preferred location. The filename will contain today’s date (e.g., customers_dump_03_21_2024.csv).
Tips:
- You can import the exported CSV back into the same Syncro site later. This could be helpful for making mass updates. A re-import will not duplicate Customer data unless you change the email addresses or main phone numbers.
- You can also import your Customers into a different RepairShopr or Syncro site.
To export your existing customers from Syncro to a CSV file, follow these steps:
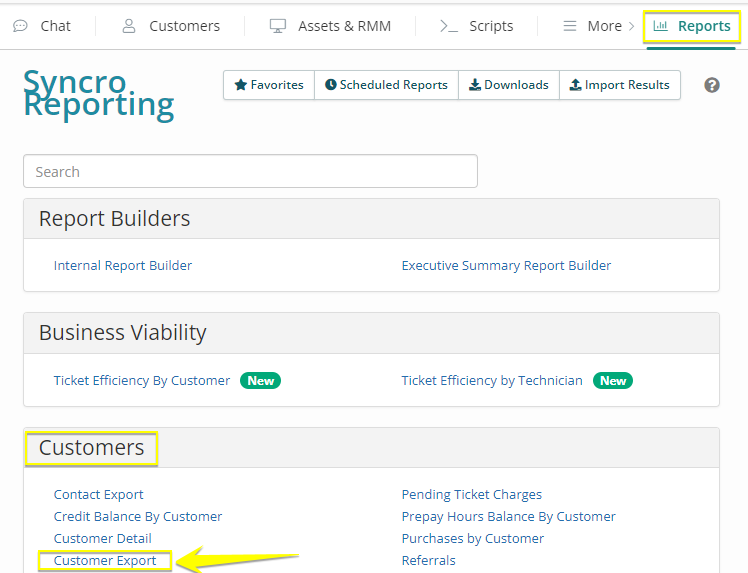
- Navigate to Reports.
- In the Customers section, select Customer Export:

 Documentation Center