
Custom Fields for Assets & Tickets
Table of Contents
Custom Fields are fields you create and manage to capture any additional information you want in Syncro. While you can also create Custom Fields for Organizations and End Users, this document focuses specifically on Custom Fields related to Assets and Tickets.
About Custom Fields
Before you begin creating Custom Fields, there are a few important things for you to know.
Naming & Required States
- Special characters (such as “/” and “?”) are not allowed in the Names of Custom Fields.
- If you use the same Name for two different fields, your information won’t save properly or may cause errors when you try to save.
- If you rename a Custom Field that's still in use, values entered under the original name will no longer be accessible. However, if you revert back to that Custom Field's original name, Syncro will restore access to those values.
- If you add a required field to a Ticket Type that’s already in use for existing tickets, these tickets will enter an invalid state and won’t be editable until you complete the required fields. If you make a field required, whenever you edit tickets already assigned to that Ticket Type, you'll need to complete the required field to save your changes.
Custom Field Type Options
This table describes the different types of fields you can use as Custom Fields:
| Type | Description |
| Text Field | Creates a single-line text field for free-form information. Use this for short text input. |
| Check Box | Creates a single checkbox with the Name you specify to its right. For example, you could use multiple checkboxes to make a list of accessories being left with a device, such as a power cord. |
| Drop Down |
Creates a drop-down menu with a list of choices, from which you can select one option. For example, you can create a drop-down menu called “OS” to select from a list of operating systems for a Ticket.
|
| Web Link | Creates a field that accepts a text, which is converted into a clickable hyperlink. Some common uses include a URL to an external documentation resource or another tool. |
| Text Area | Creates a multiple-line text area for free-form information. Use this for longer text input. |
| Date Field | Creates a field that when clicked, pops open a calendar for date selection. Alternatively, you can type a date in the format MM-DD-YYYY. |
| Popup | Creates a pop-up window that displays the information you enter in the Name field during creation of a new Asset, Contact/End User, (Customer) Organization, or Ticket. |
| Scribble | Creates a text area that allows you to draw things (e.g. a signature or unlock patterns). |
Create & Manage Custom Assets
Syncro provides a list of Asset Types by default. These include: Access Point, Firewall, NAS, Printer, Router, Switch, Syncro Device, Unmanaged Computer, and UPS. Each type of asset has associated fields, which you can manage and/or add to. You can also create your own custom Asset Types and the fields associated with them. For example, this video shows how one Syncro User uses scripts to extract useful data, which he then populates into custom asset fields:
Note: Some Asset Types and custom fields are labeled “system type” or “system field,” and cannot be edited. You can, however, specify whether they’re required, and most can be reordered.
Create a Custom Asset Type
To create a new custom Asset Type, follow these steps:
- Navigate to the Admin tab.
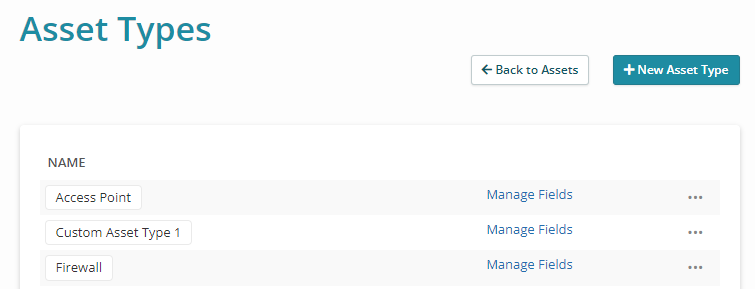
- In the Customers section on the left-hand side, select “Asset Custom Fields.” The Asset Types table displays the current list of Asset Types:
Tip: An alternative path to this page is from the Assets & RMM tab. Once you're there, select “Asset Types” from the View menu. - In the upper right corner, click +New Asset Type.
- Enter a name for your asset type in the Asset Type Name field, then click Create Asset Type. The Asset Types table displays the new field, sorted alphabetically in the list.
- Create or Manage Custom Fields for an Asset Type.
Tips:
- You can also click the ellipsis icon to Clone or Delete an Asset Type:

- Click ←Back to Assets to navigate to the Assets & RMM tab.
Create or Manage Custom Fields for an Asset Type
- Navigate to the Admin tab.
- In the Customers section in the left navigation, select “Asset Custom Fields”. The Asset Types table displays the current list of Asset Types:

- Click the appropriate “Manage Fields” link. A list of Custom Fields for this asset type displays in a table.
- Click +New Field to add a new Custom Field.
- Enter a name, and the field type. See About Custom Fields for details. You can also check the Required box.
- Click Create Asset Field. The Custom Field appears in the table for this Asset Type.
- Click ←Back to return to the Asset Types table, or repeat steps 4-6 to create more fields.
Note: You can return to the Custom Fields table for this asset type to Edit or Delete any associated custom fields. However, see About Custom Fields for some cautions.
Tips:
- You can click directly on the Required/Not Required text in the table to toggle this setting directly from the table.
- If desired, use the triple line icon (
 ) on the far right of the Custom Fields table to reorder any Custom Fields. The order they appear in this table is how they'll appear in other areas throughout Syncro.
Create & Manage Custom Ticket Types
You can create your own custom Ticket Types and the fields associated with them.
As an example, you may want to create ticket types for Projects, Service Requests, Onboarding, and Sales Opportunities. The custom fields defined for each of these types would allow you to collect different information. For example, you could display custom fields in a New Hire setup form that end users can access via the system tray, which automatically creates a ticket for you.
Watch this short video to learn more:
Note: If you want non-Global Admins to be able to manage custom ticket types, check the “Manage” box under Ticket Custom Fields in the appropriate Security Group.
Create a Custom Ticket Type
To create a new custom Ticket Type, follow these steps:
- Navigate to the Admin tab.
- In the Tickets section in the left navigation, select “Ticket Custom Fields.” The Ticket Custom Field Types table displays the current list of Ticket Types:

- In the upper right corner, click New Custom Field Type.
- Enter a name for your ticket type in the Custom Field Type Name field, then click Create Custom Field. The Ticket Types table displays the new field, sorted alphabetically in the list.
- Create or Manage Custom Fields for a Ticket Type.
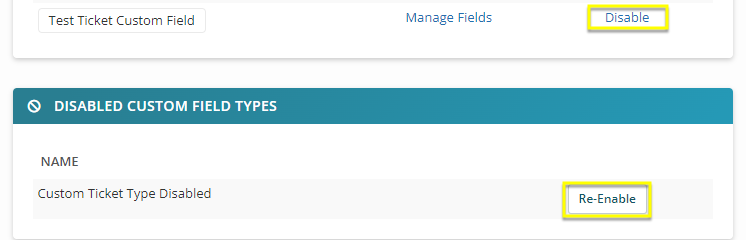
Tip: You can also click the “Disable” link to disable a ticket type. If you disable a ticket type, tickets assigned to that type still retain their custom fields, unless you reassign the ticket to a different ticket type. Click “Re-Enable” on a ticket type in the Disabled Custom Field Types table if you change your mind:
Create or Manage Custom Fields for a Ticket Type
- From the Ticket Types table, click the appropriate “Manage Fields” link. A list of custom fields for this ticket type displays in a table. (It may be empty the first time you visit.)
- Click New Field to add a new custom field.
- Enter a Name for this custom ticket type field, and use the Field Type dropdown to select its type. See About Custom Fields for details. You can also check the Required (for new ticket creation) and/or Hidden from PDF boxes (to hide in PDFs generated for Estimates, Invoices, and/or Tickets).
- Click Create Ticket Field. The custom field appears in the table for this Ticket Type.
Note: You can return to this Fields table for this asset type to Edit or Delete any associated custom fields.
Tips:
- You can click directly on the Required/Not Required text in the table to toggle this setting directly from the table.
- If desired, use the triple line icon () on the far right of the Fields table to reorder any custom fields. The order they appear in this table is how they'll appear in other areas throughout Syncro.