
About the Ticket Details Page
Table of Contents
The Ticket Details page displays whenever you’re viewing a specific Ticket.
This document provides a high-level overview of what you’ll find on a Ticket's Details page:

- The header bar at the top identifies the ticket (1). It also contains an action button bar (2), which allows you to take some popular actions on your ticket.
- The left sidebar (3) displays and allows you to change information related to the ticket.
- The main page area (4) contains sections you can use to work on the ticket.
Each of the sections on the Ticket Details page can be collapsed and expanded using the up/down caret (![]()
![]() ) icons. Your collapse/expand preferences are remembered at the browser level. However, any section with no data will always show as collapsed, regardless of your previous state.
) icons. Your collapse/expand preferences are remembered at the browser level. However, any section with no data will always show as collapsed, regardless of your previous state.
If a section contains subsections (as could happen in the case of Worksheets, for example), you'll have access to Collapse All/Expand All buttons too. Each section's title bar displays the total number of items in its title, so that even if you collapse sections you'll have that information.
Header Bar
The upper left corner of the header bar identifies the ticket by number and Subject.
| Example | Description |
|---|---|
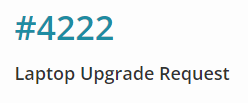 |
If the Due Date for the ticket is 2+ days into the future, the ticket number is blue. |
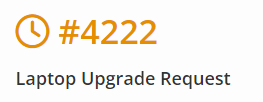 |
If the Due Date for the ticket is tomorrow, the ticket number is orange, and a clock icon appears to the left of the ticket number. |
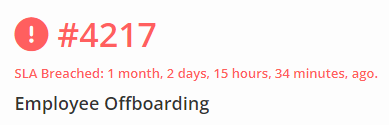 |
If the Due Date for the ticket is today or in the past, both the ticket number and Due Date are red and an exclamation icon appears to the left of the ticket number.
If a Service Level Agreement (SLA) is associated with the Organization who submitted the ticket, and that ticket has not been resolved within the parameters defined in that SLA, a line appears to display the length of the breach. |
Action Button Bar
- New: Click to select from Part Order, Appointment, Estimate, or manually add an Intake Form.
- Edit: Puts the ticket in edit mode so you can make changes; the page Syncro displays is the same as described in Manually Create a Ticket.
- Add/View Charges: $N.NN: Displays the charges currently associated with this ticket. Click to open the Ticket Line Items pop-up window. You can also see the items when you Create an Invoice.
- Make Invoice: Click to create an invoice from this ticket. The Invoice displays, allowing you to make any changes to line items. See also Create an Invoice.
-
Actions:
- Resolve: Resolves the ticket you're viewing, and keeps you on the Ticket's Details page so you can make more edits (for example, to create an invoice).
- Quick Resolve: Resolves the ticket you're viewing and returns you to the Tickets tab/page.
- Subscribe: (This action is only available when the current User is NOT the technician assigned to the ticket.) Click to become a Subscriber to the ticket and receive notifications about it. See also Collaborating on a Ticket.
- Add Attachment: Displays the “Select Files to Upload” pop-up window. (This is the same as clicking Upload in the Attachments section in the left sidebar.)
- Parts Status: Navigates you to the Part Order List page so you add and/or track the status of any parts needed to resolve the ticket.
- Customer Wiki: Navigates you to a New Documentation Page to create internal documentation related to the ticket.
- Make Recurring: Opens the ADD/MODIFY RECURRING SCHEDULE pop-up window, where you can create a template and select options to make this ticket recur on a schedule: IMAGE
- Merge: Opens the MERGE TICKET pop-up window, where you can combine this ticket with another you select. All of the information contained in the "Ticket to Remove" on the left will carry over to the "Final Ticket" on the right, with the following exceptions: Custom Fields Data, Remote Access Sessions, Computer Reports, Assets, and Parent/Child relationships. All other information (including Invoices, Estimates, Comments, Charges, and Attachments) will be included in the Final Ticket. Any time tracking on these tickets will be paused at the time of the merge. Watch this video to see how it's done.
- Split: Opens the SPLIT TICKET (TO NEW) pop-up window, where you can divide this ticket into two different ones. Syncro will copy most of the values from the source ticket. You can choose to include all Comments/Communications (i.e., Notes and/or Emails), or only the Comments more recent than the one you clicked. You can also create a New Subject for the new ticket. The Split feature is also available in the Communications section: click the ellipses icon and select Split to New Ticket.
- Cancel: Cancels the work of the ticket, but retains a record of it. (Syncro marks the ticket as "Resolved.")
- Delete: Removes the ticket completely, as if it never existed. (However, you can partially recover deleted tickets by navigating to Reports > Tickets - Deleted Tickets and clicking Restore. No ticket charges nor appointments will be restored with the ticket; the URL is the same but the ticket number is different.)
- PDF icon: Select to view a PDF of the Intake Form, Large Ticket, Ticket Receipt, Ticket Label, or Customer Label associated with this ticket. (See also: Customize PDF Templates.)
Left Sidebar
A sidebar at the left side of a Ticket's Details page displays the following sections containing information about the ticket:
Ticket Info
Quickly view the Status, Priority, Assignee, Type, Tags, SLA, Contract, Due Date, Ticket Template, Created (date), Billing Status, Additional CCs, and Subscribers for the ticket. You can inline edit all of these fields except Created (date) and Billing Status.
Syncro updates the read-only Billing Statuses for your ticket as follows:
- Non-Billable: Displays when a ticket is first created or does not have any billable items yet.
- Invoice Required: Displays when billable item(s) have been added to the ticket. (If a billable item is removed from the ticket, the Billing Status will return to Non-Billable.)
- Invoiced: Displays when you invoice for the item(s) on the ticket.
- Partially Invoiced: Displays when a billable item is added to the ticket after it's been invoiced. (Once the remaining items have been invoiced, the Billing Status will return to Invoiced.)
Tip: If you want to use the “Invoiced” Ticket Status in addition to the Billing Status, check that box in Admin > Tickets - Preferences.
Customer Info
Quickly view the Customer Organization, Assigned Contact (End User), Email, their phone, Primary Address, Ticket Address, SMS Service, and Organization/End User Tags:

- Click Change to associate this ticket to a completely different Customer Organization.
IMPORTANT: When selected, all of the elements associated with the ticket will move to the new Organization (including relevant Assets, Estimates, and Invoices). This is often used when a Lead was associated with the wrong Organization and a Ticket isn't associated with anything yet. - The (Customer) Organization, Email, Phone, and Address fields are hyperlinked. The Customer hyperlink opens the Organization's Details Page.
- Click the Assigned Contact dropdown to select an existing End User. Alternatively, select the "+New User" option at the top of the list to create one in a pop-up window. When there is an Assigned Contact:
- You can click the profile (
 ) icon to open their End User Details Page in a new browser tab.
 - Assigning an End User/Contact enables the Contact Tags field.
- You can click the profile (
- Click into any of the other editable fields to modify them inline.
Appointments
Displays any appointments associated with this particular ticket:
- Click New to create a new appointment.
- Click the ellipsis (…) icon to View Details, Edit, or Delete scheduled appointments.
Linked/Parent Tickets
When there are no existing parent/child ticket relationships for a ticket, a Linked Tickets section displays so you can create them.
When viewing a child ticket's details page, a Parent Ticket section displays here so you can view and easily navigate to its parent.
Note: When viewing a Parent Ticket, this section is replaced by a comprehensive Child Tickets section, which appears at the top of the main page area. Learn more in Work With Child Tickets.
See Link Related Tickets as Parents/Children for more information.
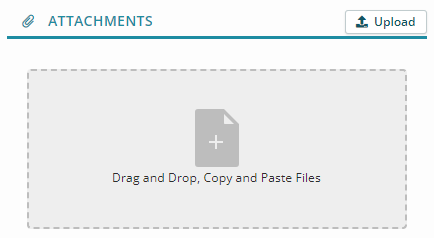
Attachments
Allows you to upload attachments for this ticket. Click Activate Copy/Paste Attachments to enable the drag-and-drop area, or click Upload and select a file. (This works exactly like it does on the Organization Details Page.)
View History (Admin Only)
Syncro Users with administrator security permissions will find a View History (Admin Only) button at the bottom of the left sidebar. Click it to view an abbreviated history of actions taken on the ticket:

Click Archives in the header to display a pop-up window that contains a full change history.
Main Page Area
The main page area at the right displays sections you can use to work on the ticket. They may include:
- Child Tickets (only displays for Parent Tickets)
- Custom Fields
- Worksheets
- Labor Log
- Relevant Assets (see below)
- Communications
Relevant Assets Section
If an asset was added when the during the ticket's creation, that Asset shows up here:

Use the icons in the REMOTE column to access the asset remotely and/or use use Backgrounding Tools.
Click the ellipsis (…) icon to Edit or Remove the asset from the ticket.
Click +New in the section header to display fields that allow you to add a new asset:

Click Add Existing in the section header to display fields that allow you to select from other existing assets associated with the customer:
