
About the Tickets Tab/Page
Table of Contents
This document provides an overview of the information you’ll find in the Tickets tab and the actions you’ll be able to take for one or more tickets in the table that displays on the page. (This is also known as the Tickets module.)
Click the Tickets tab in the Syncro header to display the Tickets page and table.
Overview
The Tickets page contains a Ticket Views panel (1), several options for searching and acting on your tickets (2), the Ticket View Metrics panel (3), and the customizable Tickets table (4):

You can read on, or watch this short video to learn more:
Use the Ticket Views Panel
Click on a View in the Ticket Views panel (1) to change both the Ticket View Metrics panel (3) and the tickets that Syncro displays in the Tickets table (4).
Unless you change this, Syncro displays the “All Unresolved” Ticket View (the first in the Pinned Views list) by default:

From the Ticket Views panel header you can click the:
- Plus ( + ) icon to create a new Ticket View.
- Gear (
 ) icon to navigate to the Ticket Views Settings page. This is where you can edit and otherwise manage all of your Ticket Views in one place. You can also set the default view there.
 - Caret ( < ) to collapse the Ticket Views panel and see more of the Tickets table.
Pinned Views show first, followed by any unpinned but available Ticket Views (Other Views). Both the Pinned and Other Views sections are collapsible. The number of tickets currently meeting the criteria for each Ticket View also displays, so you can see exactly what you want with a single click.
Tips:
- If you're on Syncro's Team Plan, you can set different default Ticket Views per technician.
- Syncro recommends expanding Pinned Views and collapsing the Other Views so you can focus on what's most important. (You'll still always have easy access to Views you don't use often.)
- The number of filters comprising the current Ticket View displays next to the Filters button menu in the action bar. See also Filter Tickets.
- Click "Compare Views" to navigate to the Ticket Views Metrics report.
Locate & Act on Tickets
In addition to using Ticket Views, you can search, filter, and group tickets using the action bar. Once you've selected one or more tickets, you can also modify them in bulk.
To search for a ticket, use either the Ticket page-specific search or Smart Ticket Search. (While not ticket-specific, the Search (all the things) box is also always available in the Syncro header.)
Search for a Ticket
There are currently three places you can search for a ticket.
- The Search (all the things) box, which is always available in the Syncro header.
- If you want to use AI to search tickets (and ticket communications/comments) using natural language, click the Smart Ticket Search button in the Syncro header.
- The Ticket page-specific search, available in the action bar as a magnifying glass icon:

Hover over it to display the search field:
Type a few characters (max 50) of the Customer or Subject. Then press Enter. Only matching tickets now display in the table. To redisplay the full list of tickets, select the characters in the search box, delete them, then press Enter.
The Ticket page-specific search box remembers your previous entries the next time you search. Hover the mouse on a specific entry and click the x that appears to clear it from the list.
Filter Tickets
In addition to the Ticket page-specific search, the action bar gives you the ability to filter (and group) tickets.
The number of filters comprising the current Ticket View displays next to the Filters button menu. Click it and expand each relevant section inside to view and/or modify the selected filters:

Click Apply to save your changes. Syncro updates the Tickets table to match your selected filters.
Note: If your Tickets table display was originally based on a view selected in the Ticket Views panel (1), changing the filters only updates the display; it will NOT update the Ticket View unless you edit it by clicking the gear () icon in the Ticket Views panel or by selecting Edit View from the gear displayed to the right of the Tickets table title. You must be a Global Administrator to customize tables.
In the Filters menu's header, click the “Clear Filters” link to remove all filters (including groups) from your Tickets table.
Group Tickets
“Group By” is a special filter that helps you visually distinguish tickets in the Tickets table by placing them into organized groups:

When you select a Primary group, Syncro displays a header row based on your selection. The number of tickets in that group display in the parentheses. Here's a Tickets table where tickets are grouped by Status:

Note: All groups start out collapsed by default. Click the caret on the header row to expand them.
If desired, you can select a Secondary group too. This is the same Tickets table with a secondary group of Tech, and only the New group expanded:

Tips:
- With inline editing you can easily assign new Tickets to Techs right here!
- In combination with the Ticket Views panel (1), groups give you the power to segment tickets for your typical use cases. You can then use the Ticket View Metrics panel (3) to see how different types of tickets are being processed by your technicians.
- In the Filters menu's Group By section, click the “Clear Groupings” link to remove groupings from your Tickets table while preserving other filters.
Take Actions on Tickets
The Actions dropdown menu allows you to take actions on multiple tickets, or export the current Ticket View:

Click the checkbox to the left of one or more tickets to enable the Edit and Delete bulk actions. Or, Click the header row's checkbox to select/deselect all tickets. Then select one of the following actions to take:
- Edit: edit the Status, Tech, and/or Tags for the selected tickets. You can also add Public (emailed) Comments and Private Comments to the tickets. See About the Ticket Communications Section for more information.
- Delete: permanently remove the selected tickets from Syncro (so be sure)!
The Export Current Ticket View option does not require you to select any tickets. This option exports your custom-filtered Ticket View directly to CSV with a single click ensuring that the exact columns, filters, and sort orders you have configured in your view are perfectly preserved in the exported file. (To keep your exports fast and efficient, each file supports up to 20,000 tickets.)
Tips: The action bar in the upper right of the Tickets page provides two additional functions:
- Click +New Ticket to manually create a new ticket.
- Use the View button menu to quickly navigate to other Ticket-related pages.
Customize & Use the Tickets Table
You can set up the Tickets table to show you exactly the information you want to see. Specify and order table columns, sort and preview ticket information, and even edit information inline.

Click a hyperlinked Ticket number in the # column to view that ticket's Details page. Clicking the hyperlinked Ticket Subject will have the same result.
Click the hyperlinked Customer Name to view that customer Organization's Details page.
The title of the Tickets table changes to match the Ticket View currently selected in the Ticket Views panel (1). When no Ticket Views are selected, the Tickets table shows “Tickets.” That means even when the Ticket Views panel is collapsed, you know what view you're looking at:

If you're using Automated Ticket Triage & Dispatch, the system suggests values for Tech and Priority fields and these appear grayed out until you confirm or select different values.
Hover on either cell, then either:
- Click the checkmark to approve the suggestion, or
- Click the dropdown caret to change the suggestion to a different value.
The field(s) return to their normal appearance with the selected value.
Tip: Click the gear to the right of the Ticket table title to set metric thresholds or edit Ticket Views.
Color Coded Table Indicators
Many cells in the Tickets table are color-coded. Unless otherwise noted, you cannot change these colors.
- Ticket Statuses are color-coded based on your Ticket Settings.
- Due Dates may be color-coded as follows:
- Red: Due date is today or past (< 12 hours).
- Yellow: Due date is tomorrow (between 12-36 hours) .
- Values in the Last Updated column may be color-coded based on the ticket and Status as follows:
- Green: Status includes the word “resolve."
- Red: Status does NOT include the word “resolve” and hasn't been updated in 3+ days.
- Yellow: Status does NOT include the word “resolve” and has not been updated in exactly 3 days.
- A ticket's tag icon may be color-coded for SLAs as follows:

- Yellow: SLA Soon (if configured)
- Red: SLA Breached
- Values in the Priority column may be color-coded as follows:
- Red: Urgent
- Yellow: High
- Blue: Normal
- Gray: Low
Specify & Order Table Columns
By default, the Tickets table displays one row for each ticket's number, the Customer the ticket is for, the ticket's Subject, and Status. It also lists the assigned Tech, the Priority, Due Date information.
Click the gear icon ( ) in the upper right of the Ticket table's header row to select which columns appear in the Tickets table. Use the triple line icon on the right to drag and drop them into your desired order:
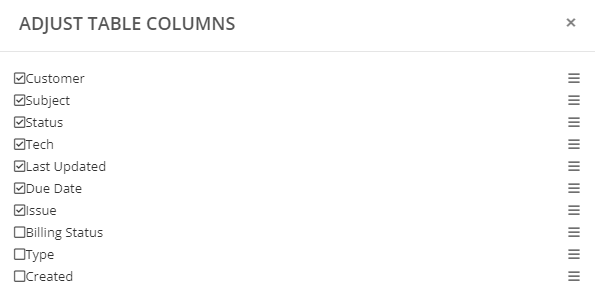
Note: If you select more columns than what fits on your screen, you'll need to scroll to the far right to see the gear icon to re-adjust the table columns.
Click Save when finished. Syncro updates the Tickets table accordingly.
Sort and Preview Information
You can sort on any of the columns in the Tickets table. A triangle icon indicates which column you’re currently sorting by, and whether the sort is ascending or descending. Click again to toggle between ascending and descending order.
Note: When Groups are also in use, clicking a column header sorts tickets by the column within each group.
Click a hyperlinked Ticket number to view that ticket's Details page. Clicking the hyperlinked Ticket subject will have the same result.
Icon Meanings & Possible Actions
In each row of the Tickets table, you may see the following information/icons:
- If this is a recurring ticket, the refresh icon (
 ) displays in the # column.
 - If the ticket has a parent/child relationship, the hierarchy icon (
 ) displays in the # column.
 - If the ticket has a Customer Response, the chat bubble icon (
 ) displays in the Last Updated column.
 - Hover your mouse to the left of the Ticket number to display the magnifying icon (
 ). Click it to see a preview of the ticket, e.g.:
Edit Ticket Information Inline
Assuming you have permissions to edit tickets, you can update most ticket information inline. For example, you could click and edit:
- Subject
- Status
- Tech
- Priority
- Type
- and so on.
Notes:
- Billing Status, Customer, and Last Updated are NOT inline editable.
- Edits made here might take a few minutes to sync for other Technicians looking at the same ticket.
Simply click into a Ticket table cell. Most often, the cell displays a dropdown menu that allows you select from a list of options.
When an editable cell contains a hyperlink, the Edit ( ) icon appears on hover. Click the hyperlink or the icon to edit the text. In edit mode, a green checkmark appears for saving changes. You can also press Enter or click outside the cell to save.