
Link Related Tickets as Parents/Children
Table of Contents
Snippet: Parent/Child Tickets
Syncro allows you to organize tickets into parent/child relationships for better organization and management. For example, you can use parent and child tickets to can break down larger projects into more discrete tasks.
Parent tickets can have an unlimited number of child tickets. However, child tickets can only be linked to one parent ticket.
Watch this short video to learn more:
The Child Ticket Summary is currently in EA (Early Access). Click here to participate.
Link or Unlink a Parent Ticket From a Child
Note: Any ticket that is not currently a child ticket can be linked, including those that are part of another company in your Syncro account.
- Navigate to the Tickets tab. Then, click the number of a ticket that you'd to have a parent (i.e., open the child).
- In the Linked Tickets section on the left side, click +Parent:

The Parent Ticket Search field displays. You can narrow the list by starting to enter a ticket number, Organization name, or ticket subject. - Select the desired ticket from the results, then click Save. The Linked Tickets section changes to Parent Ticket, with the parent ticket linked.

- You can now click the hyperlinked parent ticket to open it's Details page. See Work with Child Tickets for more information.
- Or, click the Unlink icon to terminate the relationship. When prompted, click OK to confirm your choice.
Create a Child Ticket for a Parent
Note: If you want to link an existing ticket as a child, follow the steps in Link or Unlink a Parent Ticket From a Child.
To create a new child ticket from a parent, follow these steps:
- Click the Tickets tab. Then, click the number of a ticket that you'd to have a child (i.e., open the parent).
- If there are no children yet, click +Child in the Linked Tickets section on the left side:

- If children already exist, click +New at the top of the Child Tickets section:

The New Ticket page opens in a new window. There's a reminder message at the top that your new ticket will be linked as a child:
- Enter information for the new child ticket, then click Create Ticket. Syncro creates the new ticket as a child of the parent and opens it's Details Page.
Understand Which Tickets Are In a Parent/Child Relationship
Whenever a ticket is in a parent/child relationship, you'll know because:
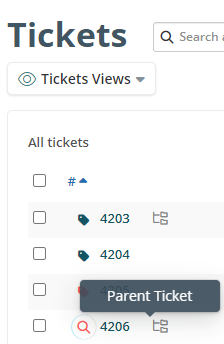
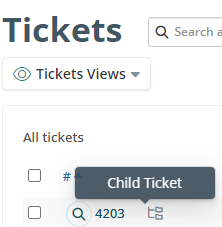
- The Tickets table displays a hierarchy icon next to the ticket number. You can hover over the icon to see the exact relationship of a given ticket:
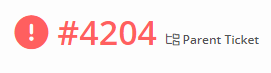
- The Ticket's Details Page shows a similar notation next to the ticket number at the top:

- When viewing a child ticket, there will be a Parent Ticket section in the left side of the child ticket's Details Page:
- When viewing a parent ticket, there will be a Child Ticket section in the main part of the parent ticket's Details Page. See Work with Child Tickets for more information.
View the Hierarchy of Parent/Child Tickets & Locate Unlinked Tickets
You can group tickets in the Tickets table by parent so that the parent appears as the first ticket in the group, and all of its children appear under it within the same group. This is a great way to see your parent/child tickets in a hierarchy.
Watch this short video to learn more:
If you like seeing your tickets organized into groups by parent/child, you can save this (along with any other filters) into a Ticket View.
With the Ticket View you can also filter the Tickets table by parent, child or unlinked tickets (tickets without any parent/child relationships) using the “Link Type” dropdown: 
Filtering by Unlinked Tickets is a great way to make sure that you aren't missing tickets that should be made children of other tickets.
Security Settings for Parent/Child Tickets
There is a security setting Admins can set to allow Syncro Users to make changes to parent/child relationships:
- Navigate to Admin > Syncro Administration - Security Groups, then click Edit for the desired security group.
- Scroll to the Ticket Parent-Child setting, and check the Edit box.
- Click Update Group to save your changes.
- Then, make sure any desired Users are in that security group!
See also: Configure Security Groups and Add & Assign Users to Security Groups.