Configure a Custom-branded Email/Mailbox
Table of Contents
Syncro sends emails on your behalf and receives emails from your end users into the system.
Although you have several options, we strongly recommend that you configure a custom-branded email/Mailbox to improve your email deliverability as well as enhance your brand.
You can read on, or watch this short video to learn more:
Prerequisites
To configure a custom-branded email/Mailbox, you'll need an email address related to the domain you own outside of Syncro (e.g., help@yourdomain.com). Many Syncro users use Microsoft's email services.
Set Up a Mailbox
First you'll set up a Mailbox, by following these steps:
- Navigate to Admin > Emails/SMS - Mailboxes.
- Click +New Mailbox.
- Change the Mailbox Display Name to something meaningful.
- Enter your Email Address, such as help@yourcompany.com.
- Click the “Automatically Create Tickets from Emails to This Mailbox” dropdown and select your desired option.
- If you've created an SMTP connection, select it from the “Select Delivery Method” dropdown. Otherwise this field defaults to “Internal Email.”
- If a Ticket fails to be created, it may still make a Lead, so if you check the:
- “Send Lead/Ticket Autoresponder (Respectively)” box, Syncro will use the Lead and Ticket Autoresponder templates when the Ticket is created. Click the links at the bottom of this page to see a preview of these templates in a new browser window.
- “Enable After-Hours Autoresponders” box, you can create separate autoresponders for both Leads and Tickets that are sent out inside and outside of your set business hours.
Tip: Click one or both links to preview the Lead/Ticket Autoresponder templates. See also step 8.
- If you set the “Automatically Create Tickets from Emails to This Mailbox” dropdown value to “Always” or “Only for Existing Customers,” additional fields appear. You can optionally preset the Issue Type, Ticket Status, and Assign the Ticket to someone.
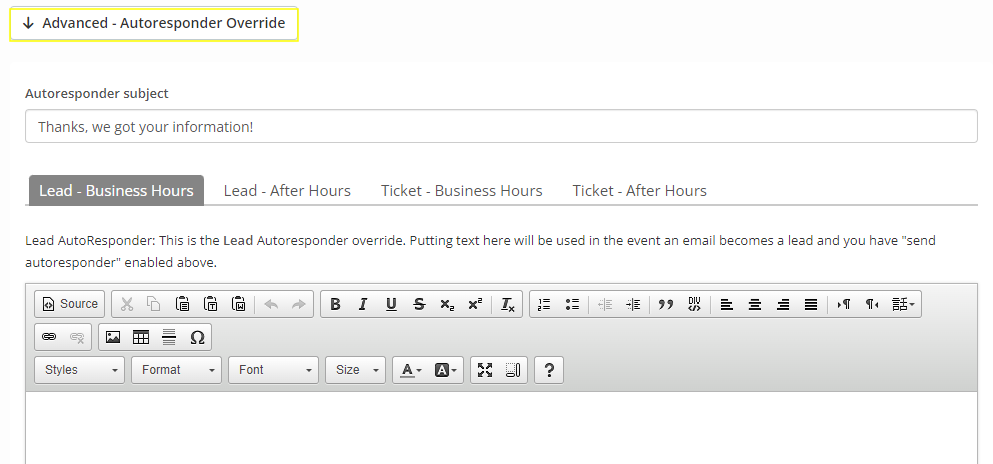
- Optionally, click Advanced - Autoresponder Override to create new Lead and Ticket Autoresponder templates you selected in step 6:

Note: What you specify for Lead and/or Ticket Autoresponders here will override any you previously customized in PDF Templates > Emails. These autoresponders will be used for this specific Mailbox only. - Click Create Mailbox. (Or Update Mailbox, if you're making changes to an existing one.)
Activate the Mailbox
After you create the Mailbox, Syncro displays an Activation Steps section to the right:

To activate the Mailbox, you'll:
- Create a forwarding rule that sends any inbound email into Syncro.
- Act like an end user and send yourself a test email.
- After you've received that email, refresh the page. The Current Status of the Mailbox (shown in the upper right corner in the Activation Steps) changes to green/Active, which means you're all set:

Note: You can always navigate to Admin > Emails/SMS - Mailboxes to see the Active/Inactive statuses of your Mailboxes. Clicking clicking the Edit (pencil) icon next to the mailbox you want to activate will display the specific instructions:
Tip: If you are unable to activate your Mailbox, be sure to allowlist the forwarding address to prevent Syncro from blocking it. Also verify you've entered the long email string correctly. A common reason the Mailbox won't activate is because an email is not getting sent to the correct address.
Choose Categories for Outbound Emails
Once you have an Active Mailbox, you can adjust the Outbound column to one or more Email Categories including Billing, Marketing, and Support.
Simply click the dropdown menu to choose the categories you want associated with the Mailbox.
Note: The Billing and Support categories can only be assigned to one Mailbox at a time. The Marketing category can be assigned to more than one Mailbox.
Once you select an Outbound email category, any email triggered from those areas of Syncro will be sent using that Mailbox. See Choose Outbound Email Categories for detailed category descriptions.
Verified Email Domains
Configuring Verified Domains can technically be done before or after configuring a custom-branded email/Mailbox. We recommend you do this at some point, however, because your email delivery is at risk without them.
