Create a Ticket Worksheet
Table of Contents
Ticket Worksheets allow you to define and track a set of tasks that need to be completed for a Ticket so that the Technician(s) working on it know what to do and what has been done. You can think of them like checklists.
You can also use Ticket Worksheets to:
- Show your clients the work you performed on their device, or
- Keep track of where you are in a longer process toward resolution of a Ticket.
Read on, or watch this short video to learn more:
Create a Reusable Ticket Worksheet
To create a Ticket Worksheet you can use as a template, follow these steps:
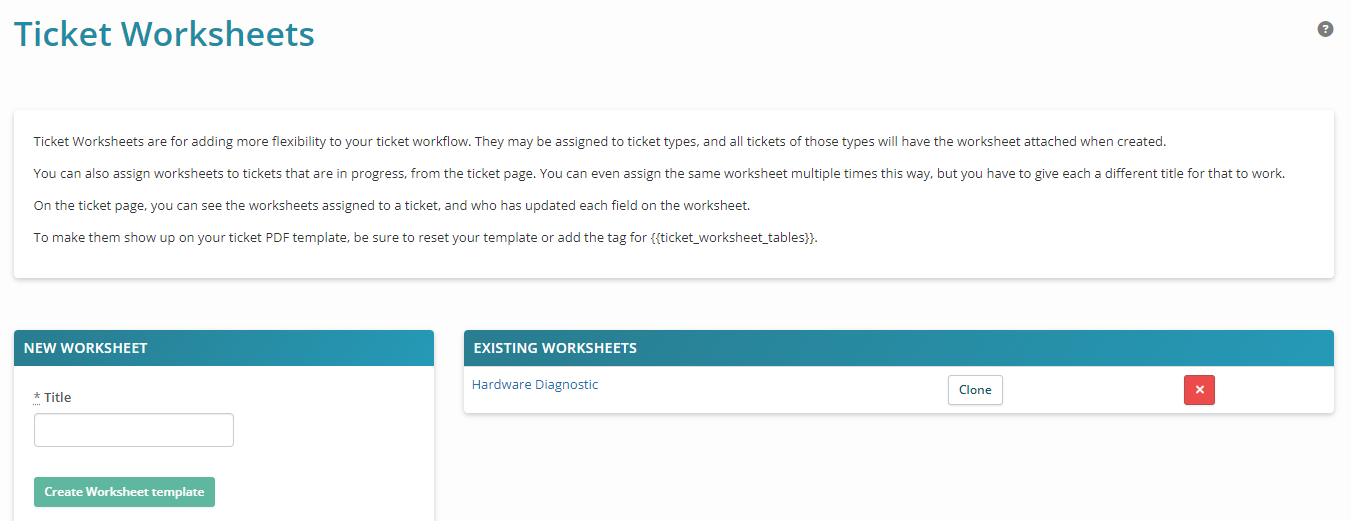
- Navigate to Admin > Tickets - Ticket Worksheets. The Ticket Worksheets page displays:

- In the NEW WORKSHEET section on the left:
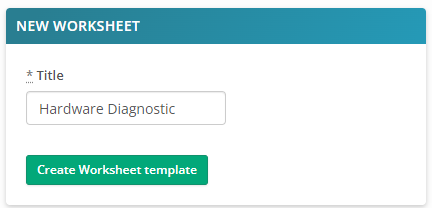
- Enter a Title (Name) for your worksheet, then click Create Worksheet Template.

Syncro displays the Ticket Worksheet editor:
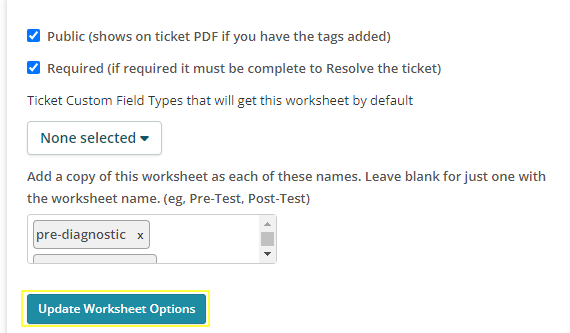
- Leave the Public box checked if you want this Ticket Worksheet to be publicly visible to customers in their Customer Portal and visible on any PDFs.
Note: To make the Ticket Worksheet show up on your Ticket PDF template, add the Template Tag {{ticket_worksheet_tables}}.
- Check the Required box if you want to require this worksheet to be completed for a technician to resolve any Tickets that use it.
- If desired, choose a Ticket Custom Field Type. When assigned to specific Ticket Types, any Tickets of that type are automatically created with the worksheet attached. See also Create Custom Fields.
Tip: You can use Ticket Worksheets with Custom Ticket Types/Fields in useful ways, such as for onboarding a new Customer.
- Optionally, enter additional names for any clones of this Ticket Worksheet. Type a name and then a comma for more than one clone. Syncro accepts the name and places an x next to it, so you can delete the clone(s) if you change your mind.
Tip: Clone names are great places to help someone understand when to use a Ticket Worksheet that contains the same fields; e.g., Pre-Diagnostic, Post-Diagnostic.
-
Click Update Worksheet Options.
- Enter a Title (Name) for your worksheet, then click Create Worksheet Template.
- In the main area on the right hand side, use the bottom panel to add fields your Ticket Worksheet that will display and capture information. You can add Text, Checkboxes, Dropdown menus, and Sections:

- On the left side, give each of your fields a meaningful label.
- For dropdown fields, also specify the list of options.
- If necessary, use the triple line icon to re-order your fields.
- Optionally, use Sections to break longer Ticket Worksheets into smaller parts.
Tips:
- Whenever you click in a text field, Syncro displays "[Enter] or click for new field." Do so to add another field of the same type below the one you're on.
- Use the x to remove dropdown field options, and the Delete (red trash can) icon to remove fields.
-
Click Save Worksheet. Syncro displays your new Tickets Worksheet in the EXISTING WORKSHEETS section:

Create Ad-Hoc Ticket Worksheets
Syncro allows you to create Ticket Worksheets on the fly. To create an ad-hoc Ticket Worksheet, follow these steps:
- Create a Ticket (or open an existing Ticket in the usual way).
- If Ticket Worksheets are available, you'll see an empty WORKSHEETS section at the top of that Ticket's Details page:

- Click +New in the upper right to display available Ticket Worksheets:

- If it's not already selected, use the Template dropdown to select "Adhoc Worksheet." Use the Title field to supply a more meaningful name.
- Click the Save checkmark to create the worksheet, (or the No sign to cancel).
- Add fields to your Ticket Worksheet as described in Create a Reusable Ticket Worksheet.
- Click Save Worksheet.
Ticket Worksheet Actions
While you're using Ticket Worksheets, there are a few other actions you might find helpful.
Collapse/Expand
Collapse the whole WORKSHEETS section using the caret (^) button in the upper right:

Or, collapse/expand each individual worksheet using the up/down carets on each subsection.
More Actions
Between the Finalize button and the collapse/expand carets on an individual worksheet, you'll find the horizontal ellipsis ( . . . ) button:
![]()
Note: These actions only apply to the worksheet attached to the Ticket; they do not affect the worksheet itself. Any edits you make here won't show up when you attach the worksheet to future Tickets.
You may see some or all of these actions, which are dependent on your security settings:
- Rename: allows you to retitle the worksheet for this Ticket.
- Make Private/Public: toggle for whether or not this worksheet is visible to customers in the End User Portal.
- Make Not-Required/Required: toggle for whether all fields this worksheet needs to be completed and the worksheet finalized before this Ticket can be Resolved.
- Full Edit: allows you to edit the fields in this worksheet, much like you'd do for an ad-hoc worksheet.
- Delete: after a confirmation, removes the worksheet from this Ticket. If the worksheet is required for Ticket resolution, it may need to be re-attached.
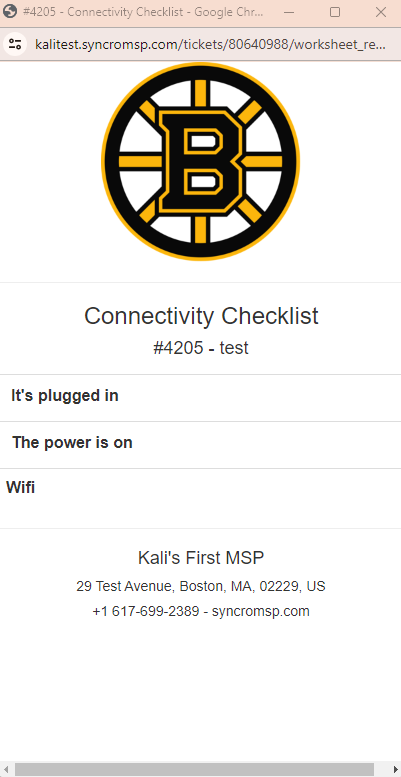
- Print: pops open a window from which you can print the worksheet on formatted 80mm receipt paper to hand to customers:

Edit, Clone, or Delete a Ticket Worksheet
To edit, clone, or delete a Ticket Worksheet, navigate to Admin > Tickets - Ticket Worksheets. The Ticket Worksheets page displays, with any existing worksheets displayed:

Click the hyperlinked name of any Ticket Worksheet to edit it. Make any changes and be sure to click Save Worksheet.
Click Clone to make a copy of it. Syncro will use the same Title/Name with “(Duplicate N)” appended to it.
Click Delete (red x) to delete it. Click OK to confirm your choice.
Rename a Ticket Worksheet
To rename a Ticket Worksheet, follow these steps:
- Navigate to Admin > Tickets - Ticket Worksheets.
- Click the hyperlinked name of any Ticket Worksheet to edit it.
- Click onto the Worksheet name, at the top of the main page:

- Type a new Worksheet name, then click the checkmark button:

- Click Save Worksheet.
Security Settings
Admins can change security settings that affect what Syncro Users can and cannot do with Ticket Worksheets.
- Navigate to Admin > Syncro Administration - Security Groups, then click Edit for the desired security group.
- Scroll to the Ticket Worksheets section, then check either the header box to allow all actions, or individual boxes as desired. (These are described in Security Permissions Reference.)
- Click Update Group to save your changes.
- Then, make sure any desired Syncro Users are in that security group!
See also: Configure Security Groups and Add & Assign Users to Security Groups.
 Documentation Center