
Work with Ticket Worksheets
Table of Contents
Snippet: Ticket Worksheets
Ticket Worksheets are checklists you define and then use to track a set of tasks. You can use Ticket Worksheets to:
- Help Technicians working a Ticket understand what you expect them to do,
- Show your clients the work you performed,
- Keep track of where you are in a longer process toward the resolution of a Ticket.
Onboarding a new employee is a great example of when you might want to use a Ticket Worksheet. Performing standard diagnostic tests might be another.
You can create Ticket Worksheet templates that you reuse over and over, or create ad-hoc Ticket Worksheets. Worksheets can also work with Custom Ticket Types and be used in Ticket Automations. They can be required to resolve a Ticket, or optional. When in use, Ticket Worksheets show in the “Worksheets” section of a Ticket's Details page with easy-to-see information about their completion status.
Watch this short video to learn more:
Prerequisites
To be able to create, manage, and use the Ticket Worksheets section on Tickets, ensure you review and have the appropriate Security Settings configured.
Create a Reusable Ticket Worksheet (Template)
To create a Ticket Worksheet you can use as a template for Tickets, follow these steps:
- Navigate to Admin > Tickets - Ticket Worksheets. The Ticket Worksheets page displays:

Tip: You can also select "Ticket Worksheets" from the View menu on the Tickets page to get here. - In the New Worksheet section on the left:
- Enter a Title (Name) for your worksheet, then click Create Worksheet Template.

The Ticket Worksheet editor displays:
- Leave the Public box checked if you want the Worksheet to be publicly visible in the End User Portal and on Ticket PDFs.
Tip: To make the Ticket Worksheet show up on your Ticket PDF template, add the Template Tag {{ticket_worksheet_tables}}. - Check the Required box to require Technicians to complete the Worksheet before being able to resolve any Tickets that use it.
- If desired, choose a Ticket Custom Field Type. When assigned to specific Ticket Types, any Tickets of that type are automatically created with the worksheet attached. (See also: Create Custom Fields for Assets & Tickets.)
Tip: You can use Ticket Worksheets with Custom Ticket Types/Fields in useful ways, such as for onboarding a new Customer. - Optionally, enter additional names to create copies of this Ticket Worksheet. Type a name and then a comma for more than one copy. Click the x next to any copy to delete it if you change your mind.
Tip: The names of these Copies are a great opportunity to help someone understand when to use a Worksheet that contains many of the same fields as another one; e.g., Pre-Diagnostic, Post-Diagnostic. - Click Update Worksheet Options.
- Enter a Title (Name) for your worksheet, then click Create Worksheet Template.
- In the main area on the right hand side, use the button bar at the bottom to add fields your Ticket Worksheet. You can add Text, Checkboxes, Dropdown menus, and Sections:

- On the left side, give each of your fields a descriptive, meaningful label.
- For dropdown fields, also specify the list of options.
- If necessary, use the triple line icon to re-order your fields.
- Optionally, use Sections to break longer Worksheets into smaller parts.
Tips:
- Whenever you click in a text field, Syncro displays "[Enter] or click for new field." Do so to add another field of the same type below the one you're on.
- Use the x to remove dropdown field options, and/or the Delete (red trash) icon to remove fields.
- Click Save Worksheet. Your new Tickets Worksheet will appear in the list of Existing Worksheets and will be available for use in Tickets.
Attach Worksheets to a Ticket
To use a Ticket Worksheet from a template you created, you attach it to a Ticket. Follow these steps:
- Create a Ticket (or open an existing Ticket ).
- If Ticket Worksheets are available to you, you'll see an empty Worksheets section at the top of that Ticket's Details page:

- Click +New in the upper right to display available Ticket Worksheets.
- From the Templates dropdown menu, select the Worksheet template you want.
- Optionally enter a new name in the Title field.
- Click the Save checkmark to create the worksheet (or cancel). A Worksheet based on the template appears and can be completed as part of working the ticket.
Use a Worksheet Inside a Ticket
When a Ticket has a Worksheet attached, the name of the Worksheet displays in the upper left corner.
- If the Worksheet is Private, you'll also see a lock icon near the name. If it's Public, you'll see the world icon.
- If it's Required to complete Worksheet to resolve the Ticket, an asterisk (*) appears to the left of the name.
You can collapse the entire Worksheets section on the Ticket Details Page using the caret button in the section header. Or, collapse/expand each individual Worksheet using their respective caret buttons:

Completed fields display the name of the Syncro User who completed them. Additionally, you can click the change log icon to get more history information:
The percent complete for the Worksheet appears to the right of the Worksheet name in a colored bubble. While it's in progress, the bubble is blue. When the Worksheet is 100% complete and the percent bubble is green, click Finalize. This puts the Worksheet into read-only mode, but you can always click Reopen to access it again.
IMPORTANT: If the Worksheet was set up as Required, you'll need to complete all the fields before you can mark the Ticket as Resolved.
Edit a Worksheet Inside a Ticket
With appropriate Security Settings, you can edit Worksheets using the options under the ellipsis (…) icon:
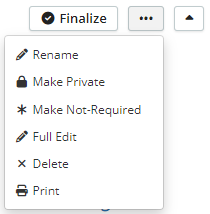
Note: These actions only apply to the Worksheet attached to the Ticket; they do not affect any Worksheet Templates. Any changes you make here won't show up when you attach the Worksheet to future Tickets.
The options may include:
- Rename: Allows you to retitle the Worksheet for this Ticket.
- Make Private/Public: Toggle for whether this Worksheet should be visible to users of the End User Portal.
- Make Not-Required/Required: Toggle for whether all fields in this Worksheet need to be completed and the Worksheet finalized before the Ticket can be Resolved.
- Full Edit: Allows you to fully edit all the individual fields in this Worksheet.
- Delete: After a confirmation, detaches the Worksheet from this Ticket. If the Worksheet is required for Ticket resolution, it may need to be re-attached before you can continue.
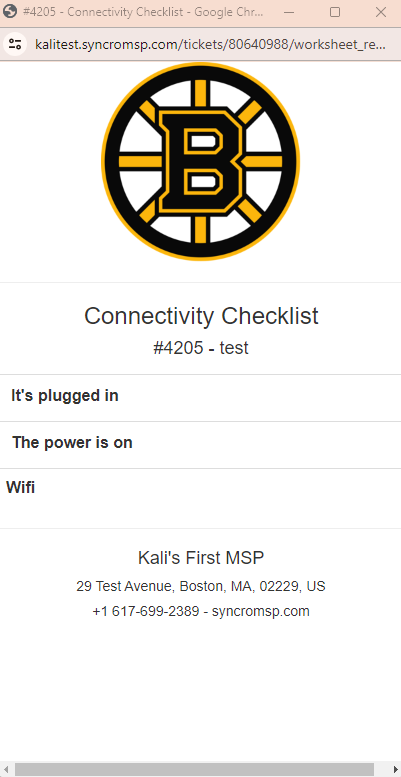
- Print: Opens a window so you can print the Worksheet on formatted 80mm receipt paper:
Create Ad-Hoc Ticket Worksheets
In addition to being able to create and select from Ticket Worksheet templates, Syncro allows you to create Worksheets on the fly. To create an ad-hoc Worksheet, follow these steps:
- Create a Ticket (or open an existing Ticket ).
- If Ticket Worksheets are available to you, you'll see an empty Worksheets section at the top of that Ticket's Details page:
- Click +New in the upper right.
- If it's not already selected, select “Adhoc Worksheet."
- Use the Title field to enter a more meaningful name:

- Click the Save checkmark to create the worksheet (or cancel).
- Add fields to your Ticket Worksheet as described in Create a Reusable Ticket Worksheet.
- Click Save Worksheet.
Edit, Clone, or Delete a Ticket Worksheet (Template)
You can edit, clone, or delete Ticket Worksheet templates.
Navigate to Admin > Tickets - Ticket Worksheets. The Ticket Worksheets page displays:
Tip: You can also select "Ticket Worksheets" from the View menu on the Tickets page to get here.
In the Existing Worksheets section:
- Click any hyperlinked name to edit the Worksheet. When finished, be sure to click Save Worksheet.
- Click Clone to make a copy of a Worksheet. By default the Title/Name will have “(Duplicate N)” appended to it.
- Click the Delete (red x) icon to delete a Worksheet. Click OK to confirm your choice.
Use Worksheets in Ticket Automations
To attach a Ticket Worksheet via a Ticket Automation, follow these steps:
- Create the Ticket Automation.
- In the Actions section, choose “Attach Ticket Worksheet" and then select the name of the desired Worksheet in the Value field:

Security Settings
Admins can change security settings that affect what Syncro Users can and cannot do with Ticket Worksheets.
- Navigate to Admin > Syncro Administration - Security Groups, then click Edit for the desired security group.
- Scroll to the Ticket Worksheets section, then check either the header box to allow all actions, or individual boxes as desired. (These are described in Security Permissions Reference.)
- Click Update Group to save your changes.
- Then, make sure any desired Syncro Users are in that security group!
See also: Configure Security Groups and Add & Assign Users to Security Groups.