
Import Products & Services
Table of Contents
When you first start using Syncro, or have many edits or additions to make to your Products, it's best to export your inventory to a CSV file, make the changes in Excel (or another spreadsheet program), and then import the file into Syncro.
Use the Products.csv Template
To import your products and/or services into Syncro, follow these steps:
- Navigate to the Products & Services page (if you don't see this option in your primary navigation bar, first select the More > dropdown):

- From the Inventory Modules button menu, select "Export to CSV":

A products.csv file containing any default/existing Products and/or Services downloads to your machine.
- Open products.csv, modify the content (with the exception of the header row), and save the file.
Tips:
- Unless you've exported your inventory from Syncro or the row contains an existing product (already in your current inventory), the 'id' column should be left blank.
- If you are adding items with quantity, make sure the 'maintain_stock' column contains the value TRUE.
- If the item is taxable, make sure the 'taxable' column contains the value TRUE.
- If you are using product categories, make sure those categories have been created in Syncro before you import.
- Don't use the $ symbol when filling out costs or price.
- If your UPC codes are long, make sure that Excel isn't shortening them using scientific notation prior to importing.
- If the ‘delete’ column contains the value TRUE and there is a product with an ‘id’ that matches, that product will be deleted.
- The name of the product should be unique.
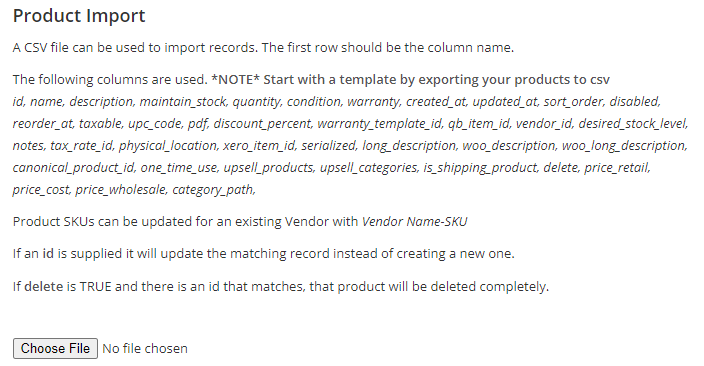
- From the Inventory Modules button menu, select “Import.” The Product Import page displays:
Tip: An alternative path to this page is via Admin > Inventory - Inventory Import.
- Click Choose File, select your updated products.csv, then click Import. A message appears at the top of the Products page, letting you know you'll receive an email when the import is complete. The email you receive contains a link that takes you to the Import Results History report:

Tip: You can also navigate to the Import Result History report via Admin > Reports. Then click Import Results (the button in the upper right corner).
About the Columns in Products.csv
The table describes each of the columns in the Products.csv template:
| Column Name | Description |
| id |
IMPORTANT: Do not edit the values in the id column!
Inventory items that are already in the system have a unique value Syncro generates. Leave this value blank for items that are brand new. |
| name | The name of the item, and a required field. |
| description | Describes the item in more detail, and a required field. The description is searchable. |
| maintain_stock | TRUE or FALSE. Use if you want Syncro to keep track of the item's quantity. So if 1 out of 3 items are sold, Syncro updates the quantity to 2. |
| quantity | The number of items currently in stock. Set maintain_stock to TRUE if you're tracking quantity for the item. |
| condition | Set to ‘used’ or any other condition you want. Useful if you're purchasing from the public and refurbishing/re-selling items and you need to track which are new vs. used. |
| warranty | The name of the warranty template you want to associate with the item. Note: Find these under Admin > Inventory - Warranty Templates. See also 'warranty_template_id'. |
| created_at | Syncro driven; do not edit. |
| updated_at | Syncro driven; do not edit. |
| sort_order | Set which page of the POS system the item will be assigned to. Adding a lower number makes the item appear first in the default list. |
| disabled | Mark this TRUE or FALSE to disable or enable an item. |
| reorder_at | Number that specifies how low a quantity you want an item to reach before considering it "low stock." This can be useful in Purchase Orders. |
| taxable | Mark this TRUE or FALSE to apply/not apply your tax rate to the item when it is sold. |
| product_category | If you have categories or wish to categorize your inventory with the default categories, type which category the item should go into. Note: Edit/view categories under Admin > Inventory - Preferences. |
| upc_code | A searchable code you can type or scan. You can either make one up, or use the item's existing UPC code. |
| discount_percent | If you are discounting the item, specify the percent as a whole number. Do not include the % sign. |
| warranty_template_id | If you have an existing Warranty Template you can copy the number from the URL when you edit the template, and paste it here to apply that template to an inventory item. Note: Find these under Admin > Inventory - Warranty Templates. |
| vendor_id | The ID associated with a Vendor name. See also ‘vendor.’ |
| desired_stock_level | The ideal amount (QTY) you'd like your inventory to be at. This is helpful for re-ordering stock. |
| notes | Specify notes if an item has any special information you need to capture. |
| tax_rate_id | Edit any of your tax rates and copy the numeric identifier from the URL on the edit page and place it here to apply that tax rate. Note: Find tax rates in Admin > Invoices - Tax Rates. See also Configure Tax Rates. |
| xero_item_id | This will only be populated if your account is using the Xero integration and has synced Products. This ID links the Syncro product to the corresponding one in Xero. IMPORTANT: Changing this ID should be done with caution, as it can lead to invoice and product sync issues. |
| qb_item_id | This will only be populated if your account is using the QuickBooks integration and has synced Products. This ID links the Syncro product to the corresponding one in QuickBooks. IMPORTANT: Changing this ID should be done with caution, as it can lead to invoice and product sync issues. |
| serialized | Specify TRUE if you want the item to be serialized, FALSE if you don't. |
| delete | Specify TRUE if and only if you wish to permanently delete an item. Disabling items is recommended over deletion. |
| price_retail | The amount you are selling this item for. |
| price_cost | The amount this item cost you. |
| price_wholesale | If you have enabled the wholesale pricing feature you can set a secondary retail price for a product. You might use this to sell in bulk, or to another retailer, for example. |
| vendor | Copy the Vendor name into this field from Admin > Inventory - Vendors. If you have Vendors for your inventory, you can easily create and submit Purchase Orders. See also ‘vendor_id.’ |
| serial_numbers | The serial number(s) for your item. |