About the Ticket Communications Section
Table of Contents
The Ticket Communications section is one part of a Ticket Details page where you'll spend a lot of time. It has many features that help you communicate both with your end users and others on your team.
This document provides an overview of the Ticket Communications section and describes how to use its features.
Read on, or watch this short video to learn more:
Overview
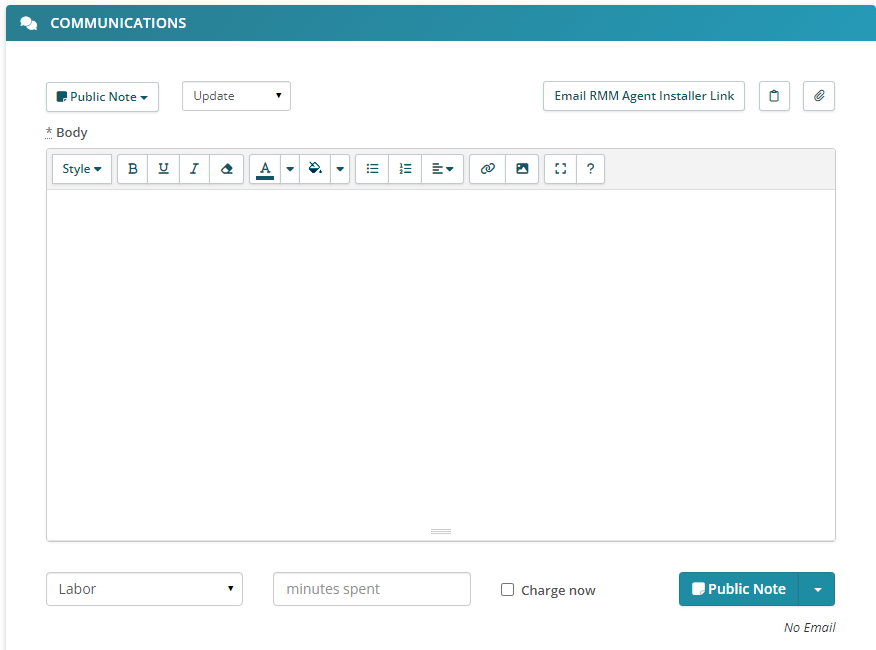
The Ticket Communications section (also referred to as Ticket Comments) gives you the ability to send Public Notes, Private Notes, Emails, and SMS texts: 
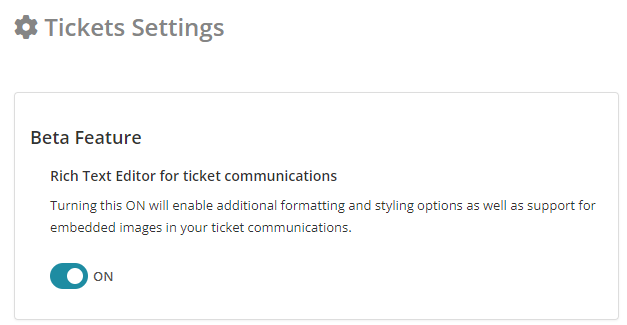
Note: You can opt into Rich Text for the Body field at the top of Ticket Settings (Admin > Tickets - Preferences): 
With Rich Text, you have more options for formatting your communication, you can add images/screenshots in context, and you can mention others. (If you don't see these features, your editor may be in Plain Text mode.)
The Visibility of Ticket Communications
The visibility of ticket communications (and whether they send messages) depends on the format you select:
| Format | In-Product Visibility | Notifications | Posted to End User Portal? |
|---|---|---|---|
|
Public Note
SMS
Email & SMS |
What you enter in the Body (including inline images for all formats except SMS) is visible to anyone internally or externally with access to the ticket.
Communication formats with “Email” also send email to the primary End User (and any email addresses specified in the Additional CC's field).
Communication formats with “SMS” also send a text to the contact for the ticket, (assuming Syncro has a mobile number). |
Any internal Syncro Users configured to receive notifications for “customer-facing comments.”
See also Notification Events Reference. |
Yes |
| Private Note |
What you enter in the Body (including inline images) is visible to the current User and any other Syncro Users (but NOT your End Users).
Tip: Use Private Notes internally to capture what was done to fix a problem/resolve an error. Then Search for Tickets Using Smart Search and easily find your solution the next time it comes up! |
Any internal Syncro Users configured to receive notifications for “hidden comments.”
See also Notification Events Reference. |
No |
Notes:
- The “SMS Service Enabled” box must be checked and a mobile Phone provided on the Organization to use the “SMS” and “Email & SMS” formats.
- If you need to include screenshots, choose the “Email & SMS” format and include the images in the email part of the communication. Then use SMS to tell the End User to check their email.
- If you want to keep the CC'ed contacts in the loop on the communication, choose the “Email & SMS” format.
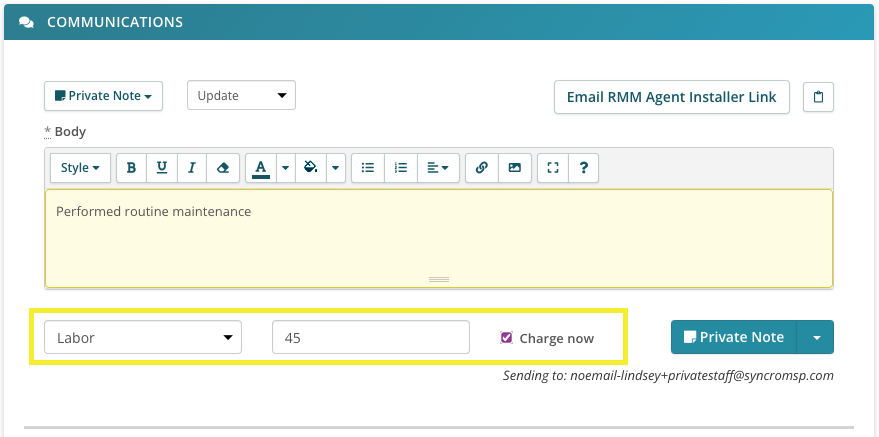
- Labor charges/duration are not included in Ticket Communications.
Best Practices for Ticket Communications
If a ticket is going to take a while to complete, you might want to comment on it every 3 or 4 days.
Keep in mind that Private comments are not visible to your End Users. Adding complementary Public comments is a good way to keep them in the loop about ongoing efforts toward resolving the ticket.
Create the Communication
Use the Subject dropdown to change the subject of your communication to:
- Issue: The default subject for a NEW ticket.
- Diagnosis: Use when you send the End User a diagnosis and recommended repair options.
- Contacted: Use to record communication with the End User .
- Approval: Use when an End User approved work you've done.
- Parts Order: Use when you want to alert the End User that you've ordered parts. (If Private Note is selected, this subject update will NOT alert the End User.)
- Parts Arrival: Use when you want to alert the End User that their parts have arrived.
- Update: The default subject for an EXISTING ticket. Use when you want to update the End User.
- Upgrade: Use when you want to recommend using new parts to the End User.
- Completed: Use when you want to let the End User know the work is complete.
- Other: Use for any other miscellaneous messages to your End User.
Note: Different Subject values change a ticket's Status and Progress differently. For more information, see How Ticket Statuses Change.
Use the "Body" text area to write your communication. You can use the editor toolbar to format the communication to your liking. You can even insert links and add pictures.
Tip: To manually add time when submitting an update or adding a Ticket communication, see Add Billable Time And/or Hardware to Tickets:

Click the appropriately-named button in the bottom right to submit the communication.
Or, you can use the button's dropdown menu to submit the communication AND change the ticket status in a single step!
If the communication is to be emailed, Syncro displays the email address to be used below the button.
Tips:
- Click Email RMM Installer Link to open a pop-up window that will insert an RMM Agent Installer Link into the Body of your communication.
- Click Canned Responses (the clipboard icon) to search and insert canned responses into the Body of your communication. If you have the appropriate permissions, you can also click Modify from the INSERT CANNED RESPONSE window to view/change these. See Canned Responses for more information.
- Click Add Attachments (the paperclip icon) to attach files to the communication. These attachments must already be listed in the Attachments section in the left side panel. Note that files uploaded to a Ticket or attached to an email sent via a Ticket Communication have a size restriction of 20MB for successful delivery.
View a Ticket's Communications
As you and your End User communicate about their ticket, Syncro displays these interactions at the bottom of the Communications section:

Tip: If you're on the Team Plan, you can enable the AI Sentiment Analysis feature to track how your End Users are feeling about your handling of their ticket.
Pin a Ticket Comment
If there's a Ticket comment/communication you'd like to pin to the top of the list, click the ellipses icon to display your options:

Select “Pin Comment.”
Syncro outlines puts a pin in the upper left corner and outlines the comment in green:

To unpin the comment, click the ellipses icon again and select “Unpin Comment.”
An Example Ticket Workflow
Syncro's ticketing system is designed to help with workflow, but you can use it however fits you best. Assuming you have NOT checked the Disable Ticket Progress Widget box in Ticket Settings, here's one example of how to use Ticket Communications/Comments in a workflow:
- Tickets start out needing a diagnosis. To do that, add a comment to the ticket with the subject “Diagnosis.” The ticket is now In Progress.
- Next, you probably want to let Syncro and your team know if/when the work is approved. To do that, add a comment with the subject “Approval.” Maybe something like: “Per our phone call, thanks for approving us to proceed with the work. We'll contact you as soon as it's ready!”
- The ticket has been diagnosed and approved, so you are ready to do the work. The ticket will have the second item in the progress list checked off:

- Once you've finished the work, change the ticket status to “Resolved.” Syncro closes the ticket and it won't display in the Tickets tab/page anymore.
There are some things many Syncro users do just before that last step to keep themselves organized:
- When the work is complete but you are waiting for someone to come pick it up, change the ticket's status to “Invoiced.”
- When you want to bill the Organization, click Make Invoice on the Ticket's Details Page. This links the invoice to the ticket, and if the “Do Not Include the Ticket Details on the Invoice PDF” box in Ticket Settings is unchecked, will put the ticket details on the bottom of the invoice. (The Progress Widget moves to Invoiced once these two steps are done.)
- Once the Organization has paid, change the ticket status from “Invoiced” to “Resolved.” If you forget, Syncro will email you a note every day about tickets that are open with a paid invoice attached. (This also changes the Progress Widget to Work Completed.)
See also: Manage Invoice Payments and How Ticket Statuses Change.
