 Documentation Center
About Tables in Syncro
Table of Contents
This document describes the general features of tables that appear throughout the Syncro platform, so you can customize and use them to quickly access the information you want.
Note: Depending on the context in which a table appears, not every table will have the same (or all) of the functionality described here.
Tables
Pagination
Pagination automatically appears at the bottom of tables containing a large number of rows. When available, use the pagination arrows to flip forward or backward through the pages:

Tip: If you're looking for something specific, sorting or filtering the table may be a better choice.
Quick Search
If a Quick Search is available for searching values displayed within a table, it typically appears directly above a table on the left side:

As you type in the search field, the table may automatically filter to display only the rows where at least one column has a value matching the string you enter. If it does not, press Enter or click the Search button to see the results.
Notes:
- If pagination appears for the table, the Quick Search returns results across pages.
- For the Tickets table, click the magnifying glass icon to display the Quick Search:
- For the Organizations table, click a result to quickly navigate to their details page:

Table Columns
Resize
Some tables have resizable columns. If you hover between two column headers and see a drag handle, click and drag it to change the column's sizing:

Sort
Some tables have sortable columns. If you hover over a column header and see an arrow (or caret), click it to sort the table by that column:

Click the header again to change from ascending to descending order, and vice versa.
Filter
Some tables filterable columns. If you hover over a column header and see a vertical ellipsis icon, you'll be given some options, including Filter:

This option displays a filters box where you can select an operator and enter a value. For example, if you filtered on the Status column, you can select an operator like “contains,” “equals,” etc. and enter a value like “Needs Reboot:”

Click +Add Filter to add additional filter rows. When you do this, you'll have an additional dropdown menu to select “And” or “Or.” This helps you build more powerful filters.
Click the X to the left of any row to remove it.
Pin/Unpin
Some tables have pinnable columns. If you hover over a column header and see a vertical ellipsis icon, you'll be given some options, including Pin Left and Pin Right:

Pinning a column will fix it to the far left or far right of the table. You can pin as many columns as you want; they will move left or right in the order you select them.
To Unpin a column, repeat these steps but select the Unpin option.
Tip: Columns that are pinned remain that way as you scroll, which can be helpful when viewing information on smaller screens.
Show/Hide
Some tables have hidable columns. If you hover over a column header and see a vertical ellipsis icon, you'll be given some options, including Show/Hide Columns:

Search for specific columns, then check or uncheck the boxes for columns you want to show/hide. Alternatively, check the Show/Hide All option at the bottom:

As you make selections, the table updates to reflect your changes.
Click Reset to reset the table to the default columns.
Reorder
Some tables have reorderable columns. If you click and drag the column header, you may be able to move the column to the position you want:
Customize (Older Tables)
Some older tables have a Customize button, or display a gear icon instead of having the drag-and-drop interaction. This control typically appears in the top left or right corner, above the table itself:


When you click the button or icon, the Adjust Table Columns pop-up window appears, where you can check boxes next to the columns you want to display, and uncheck boxes for ones you want to hide. Use the triple-line (![]() ) icon to rearrange the order, then click Save:
) icon to rearrange the order, then click Save:
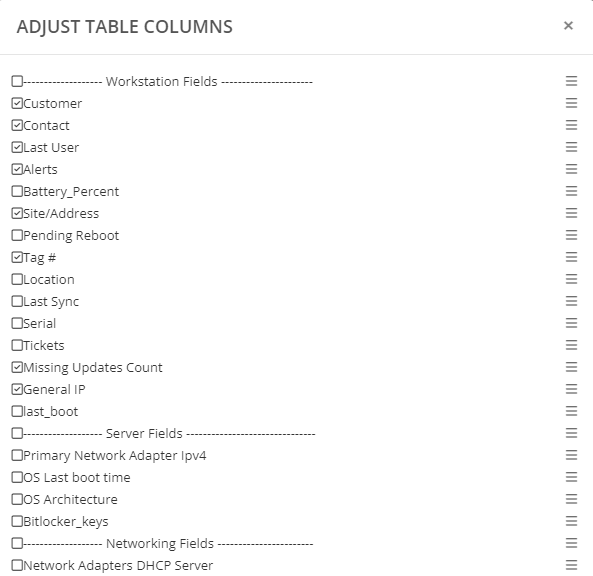
Note: Because they're older, these tables aren't as likely to have some of the other features described in this document.
Table Rows
Tip: Some tables show the total number of rows in the upper right corner.
In addition to displaying important information, table rows may allow you to:
- Perform actions in bulk (via multiple row selection),
- Take appropriate action(s) based on a specific row, and/or
- View more detailed information.
Perform Bulk Actions
To perform an action on multiple rows in a table, check one or more boxes to the far left. If you want to check or uncheck all visible rows, check the box in the header. Checking these boxes often enables buttons containing your bulk action options.
Note: Check/Uncheck All only selects/deselects the rows you see in current page or view. (See also Pagination, Quick Search, and Toggle Views.)
Take Row-Specific Actions
At the far right of a row, you may see a vertical or horizontal ellipsis icon. These icons indicate there are row-specific actions you can take.
For example, for a Syncro Tenant that has Entra ID User Sync enabled, you can Edit the User Sync Filters or Disable User Sync:

View More Detailed Information
For some tables, you can click on a row within a table to view more information about it.
The detailed information may be displayed in a side panel, such as in Network Discovery Device Details and Baseline Rules:

Alternatively, the detailed information might display in a new “Details” page, such as clicking a row in the Tenant/Compliance view of the Baseline Management Table.
Group
Some tables have rows that can be grouped by value. To add groups to the table, hover over a column's header, then click the vertical ellipsis icon and select Group By [Column Name]. For example:

The appropriate rows will collapse into a group based on your selected column, with each group collapsed by default. Click the right-facing caret ( > ) to expand an individual group:

Individual rows within the group are indented to indicate they're part of the group.
To re-collapse the group, click the down-facing caret ( v ).
Tip: You can have multiple levels of groups, if desired. For example, you can group by KB and also by Status.
Table Cells
Navigation to Details Pages
Many table cells have hyperlinks that navigate you to different parts of the platform.
For example, if you click a hyperlinked name of a Customer Organization in the Organizations table, you'll navigate to that Organization's Details Page. If you click a hyperlinked Syncro Tenant instead, you'll see that Syncro Tenant's Details Page:

Note: When several table cells in a row are hyperlinked, the table is not likely to let you view more detailed information by clicking on the row itself.
Make Inline Edits (Tickets Table Only)
For the Tickets table, you can click directly into a table cell to modify the value without ever having to open a page in full Edit mode:

Most often, the cell displays a dropdown menu where you can select from a list.
For edits to text, press Enter or click the checkmark to confirm your change.
When a cell contains a hyperlink, the Edit ( ) icon appears on hover. Click the hyperlink or the icon to edit the text. A green checkmark appears for saving changes. You can also press Enter or click outside the cell to save.